INSTALLATION MANUAL

Ceiling Dome Installation

Plan the opening, prepare the support structure, position the dome, secure it correctly, and finish the surrounding ceiling.

All Installation Manuals

Before Installation

Inspect the dome immediately after delivery. Confirm the dimensions, finish, and condition before cutting the ceiling or beginning installation. Store the dome flat in a protected area and keep the finished surface away from sharp tools and impacts.

Check local building-code requirements and confirm that the ceiling framing can support the dome, surrounding wallboard, lighting fixture, and any additional loads. Plan the opening, framing, wire supports, fixture location, and access before work begins.
Tools and Materials

  • Sponge or clean cloth
  • Putty knife and caulking gun
  • Flat-head wood screws
  • Stainless-steel construction wire
  • Compatible elastomeric adhesive caulk
  • Jigsaw or saber saw with a fine blade
  • Circular saw or carpenter’s saw
  • Metal-cutting drill bits and hacksaw
  • Ceiling wallboard, framing lumber, and shims

Important: Never nail into or strike the finished fiberglass dome surface with a hammer or another sharp object. Doing so can crack, puncture, or permanently damage the dome.

Surface and Opening Preparation

  1. Locate ceiling joists, utilities, ductwork, and electrical components before marking the opening.
  2. Lay out the opening from the dome dimensions and the required supporting flange. Verify the location from multiple reference points.
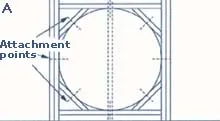
  3. Build a level, square support frame tied securely to the surrounding ceiling framing.
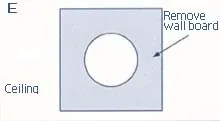
  4. Remove the ceiling material only after the framing plan and fixture clearances have been confirmed.
  5. Dry-fit the dome. Shim the support as necessary so the flange sits evenly without twisting the dome.

A. Framing plan

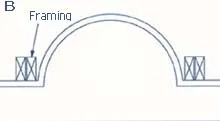
B. Installation cross-section
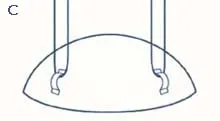
C. Wire support attachment
New-Construction Installation

  1. Complete the structural opening and install the supporting frame before the final ceiling wallboard is placed.
  2. Position the dome in the framed opening. Support it from below while the wire hangers and mechanical supports are connected.
  3. Thread corrosion-resistant construction wire through the dome hangers and secure the wire to the ceiling joists. The supports should carry the dome without pulling it out of shape.
  4. Secure the flange only through approved fastening areas. Do not drive nails or screws through the exposed finished surface.
  5. Install the surrounding ceiling wallboard and finish the transition according to the wallboard and dome material requirements.

Lay-In or Suspended-Ceiling Installation

  1. Confirm that the grid and structure above it can support the dome independently. Do not rely on lightweight ceiling panels alone.
  2. Build an appropriately sized supporting frame above the grid and connect it to the structure.
  3. Cut the surrounding panels carefully and provide a neat, supported opening.
  4. Position and level the dome, then connect its wire supports to the structural framing above.
  5. Reinstall the surrounding panels and verify that no grid member or panel places concentrated pressure on the dome.

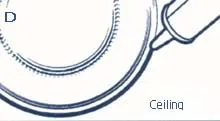
D. Edge preparation and caulk

E. Ceiling opening
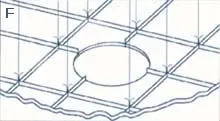
F. Suspended-ceiling application

Lighting Fixtures and Final Finish

A licensed electrician must install the fixture, junction box, wiring, and electrical connections. Disconnect power at the breaker before electrical work begins. Confirm fixture clearances, lamp heat, ventilation, and service access before closing the ceiling.

Apply a compatible paintable caulk around the perimeter where required. Smooth the joint without forcing the dome out of position. Allow adhesives and fillers to cure, then prime and paint only with coatings approved for the dome material.

Before energizing the fixture, confirm that the dome is level, all structural supports are secure, no sharp hardware contacts the dome, and the fixture can be serviced safely.