INSTALLATION MANUAL

Flexible Molding Installation Instructions

Dry-fit, adhere, fasten, join, and finish flexible molding while maintaining the intended profile and curve.

All Installation Manuals

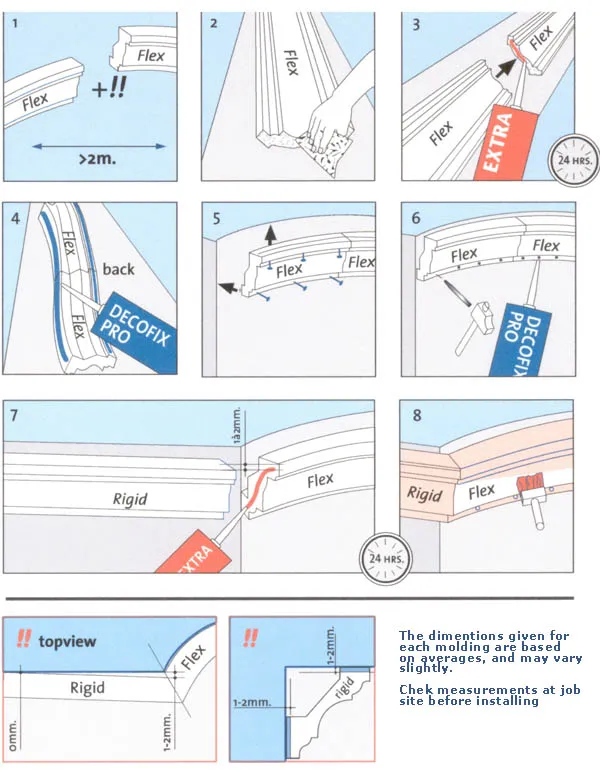
Illustrated flexible-molding installation sequence

Before Installation

  • Verify the profile, bend direction, radius, quantity, and piece lengths.
  • Inspect the molding and allow it to acclimate according to its product instructions.
  • Store pieces flat and fully supported.
  • Use only approved adhesive, joint adhesive, fasteners, filler, primer, and paint.
  • Make sure surfaces are clean, dry, sound, and free of dust, grease, and loose coatings.
  • Review minimum-radius and fastening requirements before forcing the profile into position.

Field verification: Published profile dimensions are averages and may vary slightly. Check the actual molding and jobsite dimensions before cutting or installing.

Dry-Fit the Flexible Molding

  1. Mark the beginning and end of each flexible run and locate transitions to rigid molding.
  2. Lay the flexible molding along the curve without adhesive. Form it gradually from one end rather than bending it sharply at one point.
  3. Confirm the molding follows the surface without kinks, twists, flat spots, or excessive tension.
  4. Trim ends carefully and verify profile and pattern alignment at every transition or joint.
  5. Use temporary reference marks so the piece can be returned to the tested position.

Apply Adhesive

  1. Apply the approved construction adhesive continuously to the back bonding surfaces. Keep adhesive away from exposed faces and finishing edges.
  2. Apply the specified joint adhesive to cut ends and transitions. Follow its working time and cure requirements.
  3. Position the molding on the reference line and press it evenly against the substrate.
  4. Maintain full contact while preserving the profile shape. Remove excess adhesive promptly using the manufacturer-approved cleanup method.

Fasten and Support the Molding

  1. Starting at one end, work gradually along the curve while maintaining the tested alignment.
  2. Use approved finishing nails, brads, screws, or temporary supports at the spacing required for the profile and substrate.
  3. Fasten into solid backing whenever mechanical attachment is required. Place fasteners where holes can be filled without damaging profile details.
  4. Do not overdrive fasteners or pull the flexible material out of shape.
  5. Leave supports in place until the adhesive has cured fully.

Join Flexible and Rigid Molding

Align the bedding edges and visible profile before securing either side of the transition. Follow the product instructions for the required joint gap; a small gap is often needed for joint adhesive and finishing. Support both pieces so they cannot shift while the joint cures.

Where two flexible pieces meet, match the profile carefully, apply approved joint adhesive, and allow the complete cure time before filling or sanding. Do not force a misaligned joint closed with fasteners.

Fill, Prime, and Paint

  1. After the adhesives cure, set exposed fasteners and fill holes with compatible filler.
  2. Fill transitions and small gaps without obscuring the molding profile.
  3. Allow fillers to cure, then sand lightly only where permitted for the material.
  4. Clean the surface and apply approved primer and paint. Flexible coatings may be required in demanding applications.
  5. Inspect the entire run for a smooth curve, consistent profile, secure joints, and complete finish.